Nov 21, 2008

How to: Add a borderless Flickr Slideshow to Blogger Gadgets

If you'd like a Flickr Slideshow added as a Blogger Gadget, like the one shown on this Blog, then we've got a solution for you.

Steps:

1. Log in to your Blogger and go to Dashboard

2. Click Layout

3. Click Add a Gadget

4. Scroll down to HTML/Javascript and Click the + sign

5. Put in a title if you want. Then copy & paste the following code into Content.

<iframe src="http://www.flickr.com/slideShow/index.gne?user_id=XXXXXXXX@NXX" width="180" height="180" scrolling="no" frameborder="0"></iframe>

6. You can resize the slideshow by replacing width="180" and height="180" with your own numbers. Replace XXXXXXX@NXX with your own Flickr id.

Don't know what your Flickr id is? Click here: http://idgettr.com/

7. Click Save and you're all set. Sit back and enjoy!

.

UltraVNC "Preconfigured to prevent users from setting their own password"

So we've installed UltraVNC on all of our machines via the Administrator login. Unfortunately, when we switched over to our User account, we got the following message:

"No password has been set and this machine has been preconfigured to prevent users from setting their own password."

If you received this message, as I did, here's what we have to do to fix it.

1. Log into your administrator account.

2. Go to the start menu and click Run

3. Type in regedit

4. Go to and select HKEY_CURRENT_USER\SOFTWARE\ORL

5. Click File and then Export to some location of your choice i.e. c:\UltraVNC.reg

6. Log into the User account that is displaying the problem above

7. Browse to the drive we saved the UltraVNC.reg

8. Double click and click Yes

9. Now, UltraVNC works

Tip: UltraVNC settings can be edited in the registry at HKEY_LOCAL_MACHINE\SOFTWARE\ORL\WinVNC3

.

Nov 20, 2008

How to: Remote Support via UltraVNC & DSM Encryption over VPN

"UltraVNC is a powerful, easy to use and free software that can display the screen of another computer (via Internet or network) on your own screen. The program allows you to use your mouse and keyboard to control the other PC remotely. It means that you can work on a remote computer, as if you were sitting in front of it, right from your current location." UVNC

In this post, we will go over the needs of a fictitious network we're going to support, and we'll go over instructions to install UltraVNC and deploy the DSM 128bit Encyption Plugin to our users(screenshots included). You can customize this tutorial to your own needs.

Needs on our Network:
Must work with a VPN
Connect from anywhere securely
Will run only when users need help (we do not want it running on every bootup)
Users will run the program after making a phone call to us
The program will run in the background (no tray icon)

Example: The following installation will be on a 4 computer network and 1 administrator computer

The installation file includes both Server, Viewer, and the DSM plugin. From our Viewer computer, the computers we'll be manipulating will be "Server computers." We will install UltraVNC Server on each of these 4 computers. Our computer, the administrating computer, will be the "Viewer computer," and we will only need UltraVNC Viewer.

Instructions:

Server Computers Setup:
1. Download via their website

2. Run UltraVNC-XXX-Setup.exe

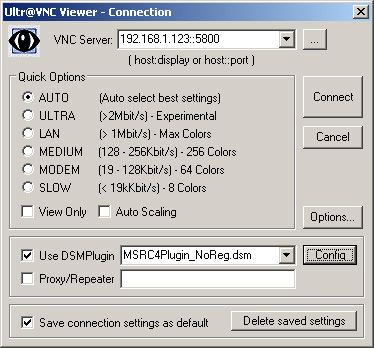
3. Install UltraVNC on one of our "Server computers." For illustration purposes, it has an IP of 192.168.1.123


4. Once at this screen, untick all.

Optional
: If you want UltraVNC to start up every time at bootup to machines you wish to connect to, click on "Register UltraVNC Server as a system service."


5. Click Install. Exit out of any UltraVNC instances that pop up. Close down any background instances of WinVNC.exe

Copying and configuring the DSM Encryption Plugin
6. Now is the time to download and configure the DSM plugin. Download and unzip the file.

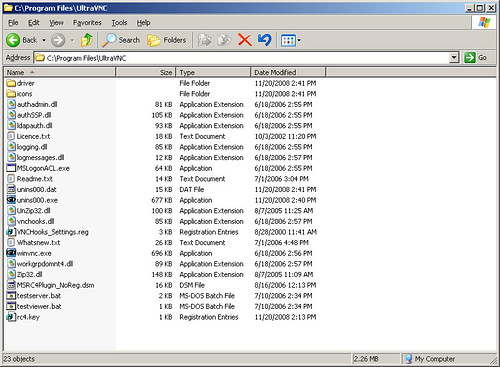
7. Copy the files to the location you installed UltraVNC, c:\Program Files\UltraVNC. As long as "MSRC4Plugin_NoReg.dsm" is located in the UltraVNC folder, then we should be ready for the next steps.

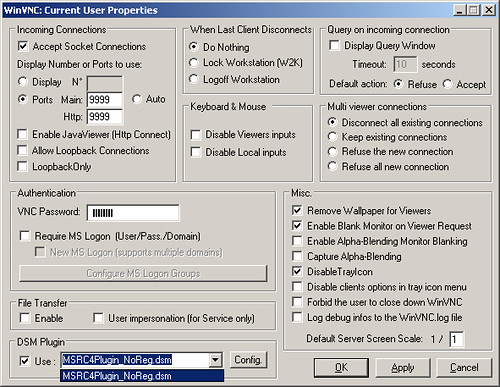
8. Open up UltraVNC Server. In this screen, the standard port for Main is 5800.

(If you change the port to something else, later on you will need to configure the client to match the port)

Set an authentication VNC password.

Next, click the drop down menu next to DSM Plugin and choose "MSRC4Plugin_NoReg.dsm."

Click Config.

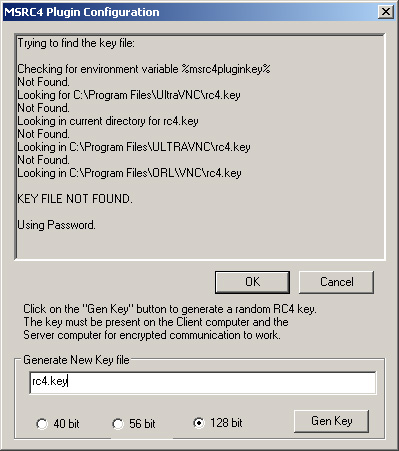
9. When using the DSM Plugin, UltraVNC will be looking for a "rc4.key" which is the 128bit key we will generate. Name the key like the screenshot below "rc4.key" without the "".

Click Gen Key. OK.


10. The key will show up in c:\Program Files\UltraVNC

11. This key will be used on the computer we just configured as well as the client computer, so we'll need to copy this key on a USB stick to later transfer to our client computer.

Example: You could use this key by copying the key to all 4 Server computers and our 1 client computer c:\Program Files\UltraVNC.

Viewer (admin, support desk) Computer Setup:

1. Run UltraVNC-XXX-Setup.exe

2. Click the drop-down menu and select Viewer Only. Install.

3. Copy the rc4.key, we generated earlier and copied to our USB stick, and copy it to our Viewer comptuer c:\Program Files\UltraVNC

Testing via VPN:

1. Using our Viewer computer, now, we will connect over the Internet via our VPN connection. Once we're connected to our local network, we will then connect to the "Server computer" we just set up.

2. On the "Server computer," have the user open up UltraVNC Server. It will load up and run in the background.

3. On our "Viewer computer" open up UltraVNC Viewer, click Connect, and type in the password. You should be able to now see the "Server computer's" screen. Congratulations!


.

Nov 19, 2008

The Original FREE P90X Excel Workout Sheet

Simple P90X Excel Workout Sheet for: Chest & Back, Shoulders & Arms, Legs & Back, Chest Shoulders Triceps, Back & Biceps
Originally posted: March 7th, 2008

A free and simple P90X Excel Workout Sheet made to keep track of our performance during workouts. It's a simple excel sheet following 5 workout routines. You can easily fill in how many reps you did and the weights.

Instructions:

1. Download:
http://rapidshare.com/files/109134670/workoutsheet.xls

2. Print each page and staple

3. Keep the paper next to your workout spot to write down reps and weights

P.S. I took down my other site P90Xlive.blogpot.com to consolidate it into this one.

.

Oct 16, 2008

How to set up a Power Kite: Step by Step


The goal of this video is to help new power kite flyers get into the sport. The kite in the video is a fixed bridle quad line power kite with a two handle setup.

If you're flying for the first time, please fly with the appropriate wind/weather conditions for your kite.

0:10 Unpacking
0:40 Bridles: Power and Brake lines
1:00 Lay out your lines
1:10 Attaching our power line to the bridle
1:25 Lark knot
2:15 Attaching our brake line to the bridle
2:50 Handles
3:42 Launch
4:07 Troubleshooting tips


Click through to Youtube for more tips in the description and comments section

Feb 14, 2008

How to: Install WinXP + Nlite via Acronis to SD or USB

Updated 4/08/08: uploaded compiled cabsdk files and compiled Hitachi Microdrivers files. For my results and experience, please refer to the end of post #2. Also, please read Tommot's post #4 for additional install information.

Hey everyone,

I'm writing this up as an addon to the eeepc wiki. The information here was taken from the wiki and the forum so many props go to the original creators CorvetteZ0606, DonkeyBeliever, and all others. 

This guide will install Windows XP to a SD card via Acronis and Nlite. Hopefully this will help solve some of the problems we all had to go through, to save you TIME, and to get you up and running. The guide is long as I put in every detail I went through. I will add more to it later.

Honestly, I made 6 XP CD's, and installed probably 10 times until I got it working.  Yes, it finally works! Through my trials and errors, here's what I learned:

____________________________
What I used:
Asus eeePC 4G Laptop
40GB USB hard drive, I've tried a 16GB USB stick, and 2GB SD Card and they all work
Another PC Desktop referred to as Main Computer
Wiki method 2 and part of method 1 (http://wiki.eeeuser.com/howto:installxp)
Windows XP SP2
Microsoft Cabsdk EDITED cabsdk (http://rapidshare.com/files/92250474/cabsdk.rar) OR (http://download.microsoft.com/download/ … cabsdk.exe
Nlite (http://www.nliteos.com/download.html)
Hitachi Microdrivers EDITED Hitachi Microdrivers (http://rapidshare.com/files/92250062/ed … 24_320.rar) OR (http://www.xpefiles.com//files/xpfildrvr1224_320.zip)  
External USB CD-ROM
Acronis Home V11
Notepad2 (http://www.flos-freeware.ch/notepad2.html)

____________________________
Problems I had before figuring this out:
BSOD right after seeing the Windows XP Boot Logo
The BSOD said windows has to shutdown to prevnt further damage bla bla bla. Something partition, virus, bla bla bla

____________________________
Method:
(you can substitute your USB device when I say SD card, ie USB stick, SD, hard drive)
Backing up Xubuntu, Xandros, etc. on your eeePC for later restoration
Connect your external CDROM
Boot eeePC and hold Esc
Insert Acronis Boot CD
Backup your SSD on the eeePC via Acronis Boot CD to your SD card using Backup
Name your file xubuntueeepc, xandroseeepc whatever
Save to your SD card
Close Acronis and reboot
Once safely rebooted, remove SD Card
Copy “xubuntueeepc” file from the SD to your Main Computer

____________________________
On your Main Computer
Put your XP CD into your main PC
Open up Nlite
Use Nlite to Copy XP to your main PC c:\xpsdhc
Leave Nlite open and minimize

I've compiled the USB cabsdk files here: http://rapidshare.com/files/92250474/cabsdk.rarOR do the following 4 steps
-Follow the wiki and edit the usb... files (download and use notepad2 to edit) (http://wiki.eeeuser.com/howto:installxp)
-Follow steps 2-23 on the wiki method 2
-Copy these edited files back to I386
-Go back to Nlite, which you minimized

Here are screen captures of my Nlite install for reference:http://rapidshare.com/files/92255558/nl … ptures.rar

Now create your ISO to CD
Burn your ISO to CD (my ISO was roughly 320 megs)

____________________________
Turn on your eeePC and hold Esc
Boot up to your external CDROM and boot off of the new XP CD you just created
Delete all partitions on the SSD
Install XP to the SSD

____________________________
Upon first boot into XP
Go into System Properties, Turn off system restore, paging file, and screensaver
I've compiled the Hitachi Microdrive files here: http://rapidshare.com/files/92250062/ed … 24_320.rar OR follow the next 2 steps
-Take a SD card and copy the Hitachi Microdrivers from your Main Compute to the Desktop of the eeePC WindowsXP
-Follow the instructions on the Wiki in Method 1 to edit the .inf file (http://wiki.eeeuser.com/howto:installxp)

Right click My Computer on your eeePC and go into System Properties
Go into Update Drivers and install the Hitachi Microdrivers to Cardreader
***Refer down below to Tommot's post***
When The Hardware Upgrade Wizard window opens:

1. choose, Yes, this time only
2. choose, Install from a list or specific location (advanced)
3. choose, Don't search, I will choose the driver to install
4. click, Have Disk
4. browse, point to the Microdrive filter folder on your desktop
5. the final window you will see is that the Hitachi Microdrive has actually been selected 
and is ready for installation. you will also see the caution sign ...This driver is not digitally signed.
***----------------------------------------***

Before rebooting!!! Confirm in My Computer that your SD card shows a Local Disk and not a Removable drive, if trying a USB stick, confirm that it's a Logical Disk
Confirmed: (If you want to use a USB thumbdrive or hard drive, for your XP drive instead of SD, you'll need to connect the USB stick up for windows to recognize it, and after windows XP installs the drive, instead of installing the Hitachi driver for the cardreader, do so for your USB thumbdrive)
Reboot
Let XP load
(If installing to a drive bigger than 4 GB +, then now's the time to resize your partition on your main computer. I used Acronis Disk Director V10)

____________________________
Put in the Acronis Boot CD to your External CDROM
Reboot XP
Hold Esc and boot to CDROM
Backup the SSD drive with XP and name it eeepcxp. Backup to your SD
Close Acronis and reboot
Once safely rebooted, remove the SD Card

____________________________
Copy “eeepcxp” from your SD Card to your Main Computer
Open up Acronis Home V11
Restore eeepcxp to your SD Card that you want to boot off of (restore all including the MBR)

____________________________
Go to your eeePC, change the background to something else

____________________________
Back to your main computer, once the backup is finished, stick it in your eeePC and reboot
Hold Esc
Boot off of your SD card

____________________________
If all is well, you can now restore your original drive with whatever was on it.
Copy xubuntueeepc you originally backed up to another SD or USB stick
Restore xubuntueeepc to the SSD

Once finished close Acronis and reboot
Hold Esc
Boot into XP
Grab your ASUS CD that came with your laptop
Install the drivers

(If you used a SD card larger than the partition of 4GB, and there's unpartitioned space, you can try using Acronis Disk Director V10 to resize the partition)

There we have it! Hopefully all is well. Good luck!

It turns out the 2GB SD install was too limited for my usage. After trying to install Adobe CS3 suite, the Shared Common Files blew up the installation past my 2GB SD card limitation.

I've now tried installing XP onto a 16GB USB Thumbdrive using the methods described above. I can confirm that it works.

First impression is that it loads a little slower, but this could be due to my USB Thumbdrive specs. Overall, I'm happy with the install, and with the extra space, think of the possibilities.

EDIT 2/15/08: I've run into some problems with the USB install, so until I figure this out, the USB thumbdrive install is unconfirmed unless another user can confirm it?

EDIT 2/17/08: Confirmed, by following the tutorial, the USB stick install was successful. I'm currently installing the asus drivers, windows update, and apps on a 16GB flash drive. EWF, Enhanced Write Filter, is the next feature I'm researching to limit the amount of writes to the disk.

EDIT 2/20/08: Productivity on an USB SD or Flash drive was too limited and slow for my use. I've changed mediums and have settled with a 2.5" USB hard drive.

.

Oct 18, 2007

MR2 5SFTE Turbo Build - 2005 - 2007


MR2 NA-T built photo set

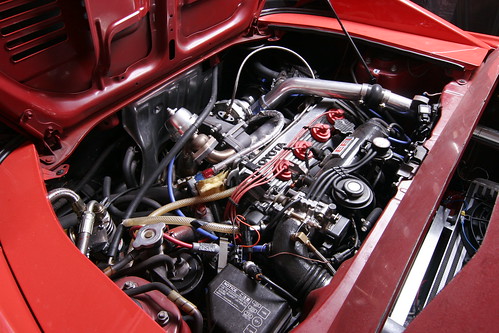
In 2005, I decided to embark on a journey with my 91 MR2 NA. I wanted to add more power, feel the whine of a turbo, and learn something during the process, so I started a humble 91 MR2 NA to NA-Turbo conversion.

Parts were chosen and built around a rebuilt T3 Turbo pulled from an old Dodge Daytona and log manifold purchased on eBay. I pretty much learned step by step from there trying to figure out the needs of the Turbo because at the time, I did not know what was needed to make it run.

The Project:
Oil and coolant http://mr2oc.com/showthread.php?t=4296:
There are hot n' cold supply and dump connections in the 91 NA. There are two bolts in all 91 NA's that are plugged. All that's needed is purchasing an adapter screw to put in place for the hot and cold side for coolant. I believe I purchased these adapters from mcmaster.

Aeroquip hoses and adapters would be used to connect to the adapters from mcmaster.

Also, I tapped for oil from the oil pressure sensor gauge. I used a T connector from my local Royal Brass.

Intercooler:
I saw many trunk intercooler setups on the mr2 forums and immediately fell in love. The setup screamed awesomeness. Using aluminum square tubing from lowes, I created a brace attached with brackets to the firewall and rear trunk, which held the intercooler in place.

Fuel:
At the time, green top Toyota Supra injectors were hard to find! Luckily, a local junkyard had the right model Supra in stock. The injectors were pulled and sent to Witchhunter Performance for cleaning.

Piping:
I purchased all my piping from eBay, and the silicone hoses were purchased at Atpturbo. JR - Mr. Jcrew on the MR2 boards, hooked me up with some quality hose clamps.

Water Injection:
An SMC water injection controller was adapted to work with a Shurflo pump and accumulator. I wired up 5-post relays to get the whole thing connected.

Electronics:
I chose a Zeitronix Wideband AF for metering which would display data on a laptop while driving. The wideband displayed RPM, Oil pressure, Boost, and EGT, oh yeah, and A/F =P.

Exhaust & External Wastegate:
The exhaust was last on the list. I purchased 2.5 stainless steel piping from an online source (I dont' remember) as well as a flex pipe. A SS adapter plate was used connecting the turbo to the downpipe, gotta love eBay!

The piping for the wastegate would be cut from a bathroom stall handicap bar purchased at Lowes - thank you VW forums. This fit perfectly for a 38mm Tial type wastegate.

Jeff, Mr. Griftersduece on the boards helped me weld the whole thing together. Now I wish I had taken pictures of the beautiful beading Jeff created, but just imagine shiny, even scales going all around the parts.

A site I made in 2005 dedicated to the NA-T:
http://imadethis.atspace.com/5sfte.htm

Back to NA:
After much enjoyment and a great learning experience, the car was put back to NA after what seemed to be an oil leak in the Turbo. The factors leading to this decision was finding time to work on the car, other interests, and saving money for other enjoyments in life. The car is still up and running but with a '93 NA motor, and yes sir, I still smile every time I get in and drive.

.