 "UltraVNC is a powerful, easy to use and free software that can display the screen of another computer (via Internet or network) on your own screen. The program allows you to use your mouse and keyboard to control the other PC remotely. It means that you can work on a remote computer, as if you were sitting in front of it, right from your current location." UVNC
In this post, we will go over the needs of a fictitious network we're going to support, and we'll go over instructions to install UltraVNC and deploy the DSM 128bit Encyption Plugin to our users(screenshots included). You can customize this tutorial to your own needs.
Needs on our Network:
Must work with a VPN
Connect from anywhere securely
Will run only when users need help (we do not want it running on every bootup)
Users will run the program after making a phone call to us
The program will run in the background (no tray icon)
Example: The following installation will be on a 4 computer network and 1 administrator computer
The installation file includes both Server, Viewer, and the DSM plugin. From our Viewer computer, the computers we'll be manipulating will be "Server computers." We will install UltraVNC Server on each of these 4 computers. Our computer, the administrating computer, will be the "Viewer computer," and we will only need UltraVNC Viewer.
Instructions:
Server Computers Setup:
Server Computers Setup:
1. Download via their website
2. Run UltraVNC-XXX-Setup.exe
3. Install UltraVNC on one of our "Server computers." For illustration purposes, it has an IP of 192.168.1.123

4. Once at this screen, untick all.
Optional: If you want UltraVNC to start up every time at bootup to machines you wish to connect to, click on "Register UltraVNC Server as a system service."

5. Click Install. Exit out of any UltraVNC instances that pop up. Close down any background instances of WinVNC.exe
Copying and configuring the DSM Encryption Plugin
6. Now is the time to download and configure the DSM plugin. Download and unzip the file.
7. Copy the files to the location you installed UltraVNC, c:\Program Files\UltraVNC. As long as "MSRC4Plugin_NoReg.dsm" is located in the UltraVNC folder, then we should be ready for the next steps.
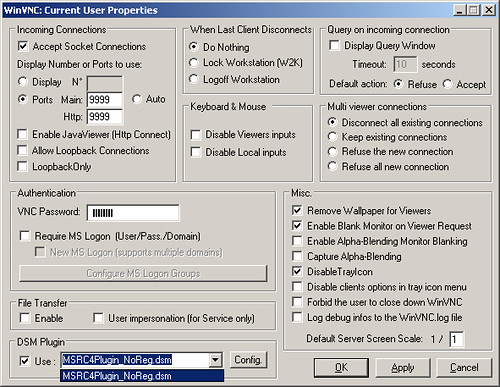
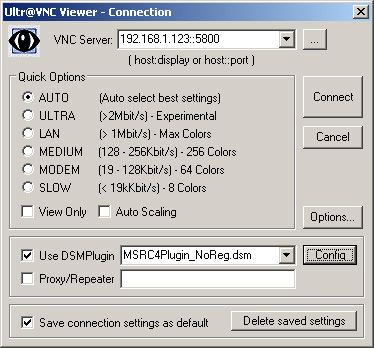
8. Open up UltraVNC Server. In this screen, the standard port for Main is 5800.
(If you change the port to something else, later on you will need to configure the client to match the port)
Set an authentication VNC password.
Next, click the drop down menu next to DSM Plugin and choose "MSRC4Plugin_NoReg.dsm."
Click Config.
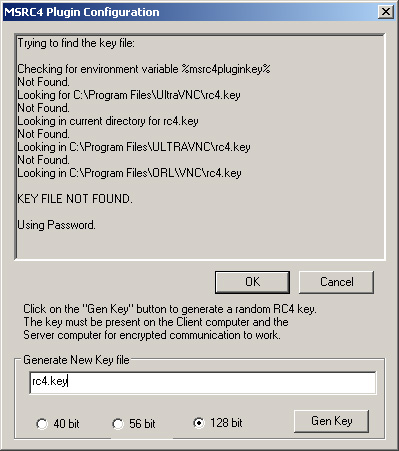
 9. When using the DSM Plugin, UltraVNC will be looking for a "rc4.key" which is the 128bit key we will generate. Name the key like the screenshot below "rc4.key" without the "".
Click Gen Key. OK.
10. The key will show up in c:\Program Files\UltraVNC
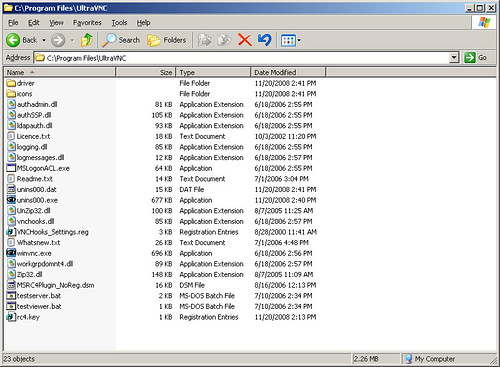 11. This key will be used on the computer we just configured as well as the client computer, so we'll need to copy this key on a USB stick to later transfer to our client computer.
Example: You could use this key by copying the key to all 4 Server computers and our 1 client computer c:\Program Files\UltraVNC.
Viewer (admin, support desk) Computer Setup:
1. Run UltraVNC-XXX-Setup.exe
2. Click the drop-down menu and select Viewer Only. Install.
 3. Copy the rc4.key, we generated earlier and copied to our USB stick, and copy it to our Viewer comptuer c:\Program Files\UltraVNC
Testing via VPN:
1. Using our Viewer computer, now, we will connect over the Internet via our VPN connection. Once we're connected to our local network, we will then connect to the "Server computer" we just set up.
2. On the "Server computer," have the user open up UltraVNC Server. It will load up and run in the background.
3. On our "Viewer computer" open up UltraVNC Viewer, click Connect, and type in the password. You should be able to now see the "Server computer's" screen. Congratulations!
.
No comments:
Post a Comment