Dec 13, 2008

How to: Re-Enable Boot Booster on the eeePC

Warning to eee PC owners with Boot Booster!!! If you are going to change your partitions, before you partition, make sure you leave the 8 megabyte Boot Booster partition alone.

If you lost Boot Booster from partitioning, here's how you can get it back.

Thanks to RalphWiggum on the eee PC forums for writing the original How-to. This is an adapted version for re-enabling Boot Booster for the eee PC 1000X on Windows 2008. For other OS flavors, click on the link above.

I got Boot Booster working for Windows 2008 Server. Partition Magic didn't work for me in Window 2008, but there's a simple-to-use partitioner built into 2008.

1. This article here describes how to access it:
http://www.vistarewired.com/2007/02/16/how-to-resize-a-partition-in-windows-vista
2. After following the link in step 1, I shrank my C: drive by 16 megs
3. Created a new partition using Windows 2008, no file system, no drive letter, do not set active
4. Used RalphWiggum's tool, downloadable below, and followed instructions to change the ID

"RalphWiggum wrote:

Ok...this might come in handy but not necessary...get it anyway
http://www.sendspace.com/file/1c3qoe
-apply the format procedure and after completion, right click partition and change its ID to 'EF'"

5. Click apply
6. Reboot, then shutdown, once you boot up again
7. Windows should load almost instantly upon your next bootup. Be quick to push F2 if you ever need to.

.

Dec 12, 2008

My love/hate relationship with Windows 2008 UAC

Windows 2008 Server User Account Control. UAC provides unauthorized access, such as spyware and viruses, to the startup, registry, and services. There's a pop up that asks for permission if you want to modify certain system settings or install software.

When converting Windows 2008 Server to a "Workstation environment," at first, I found UAC annoying because I was experiencing UAC for the first time while setting up my PC. Who would want popups every time you make a change to your operating system, right? I do, I want those popups. Here's why:

Benefits of UAC:
1. A more secure working environment
2. Protection against spyware and viruses
3. Not really a benefit, but UAC only gets in the way during the setup process of a new machine

Conclusion:
UAC can be a bit of an annoyance at first, but after correctly setting up my PC, I haven't seen UAC since.

Bonus reading material:
Make Vista Launch UAC Restricted Programs in Startup:
http://blogs.techrepublic.com.com/window-on-windows/?p=616

.

Dec 11, 2008

1000X eee PC Owner's Guide to the Galaxy

As a new owner of the 1000X, here are the guides I went through to update and modify my laptop. It should save time for new owners of the 1000H or 1000HA looking to do the same.

Stop that annoying clicking Hard Drive sound by jko:
http://forum.eeeuser.com/viewtopic.php?id=46222

Free Microsoft Windows 2008 Server Edition for College Students by uptempo:
http://forum.eeeuser.com/viewtopic.php?id=46761

Vista or Windows 2008 install guide by CarlosNR:
http://forum.eeeuser.com/viewtopic.php?id=51025

Updated Windows XP and Vista drivers for the 1000H/1000HA by LaiWongBao:
http://forum.eeeuser.com/viewtopic.php?id=37175

1000HA Wireless Vista Drivers by tqnguyen:
http://forum.eeeuser.com/viewtopic.php?id=53871

Cooler running eee PC 1000X by lasertech:
http://forum.eeeuser.com/viewtopic.php?pid=382274

Overclock your 1000X modified eeectl by CarlosNR:
http://forum.eeeuser.com/viewtopic.php?id=54015

More responsive keyboard mod by coninsan:
http://forum.eeeuser.com/viewtopic.php?id=39113

Fix a noisy fan by danristei:
http://forum.eeeuser.com/viewtopic.php?id=42655

Restore a 1000H without a DVD drive by spider:
http://wiki.eeeuser.com/restore_1000h

Happy computing

.

Dec 10, 2008

How to: iCall - Finally, Free VOIP Calls - Instructions & Minireview

Here's the situation: you have a laptop, an internet connection, a microphone, and now you're thinking I want to use the convenience and portabilty of my laptop to make VOIP calls. Well hey, let's do just that, but let's make the deal even sweeter by making those calls FREE. Not a 1 minute trial, or give us your credit card number trial, no, free.

iCall will connect you via internet to landline phone. All you have to do is listen to a 10 second ad, and then they connect your call. Not only can you make calls but you can also recieve calls from a landline to your internet connected device. Now I say device because iCall will work with the iPhone and iPod Touch as well. Are you ready to make the jump? Here goes...

Instructions to make calls:
1. Download their software and install: http://www.icall.com/desktop/
2. Sign up for a free New Account
3. Log into your account using their software
4. Type in the number you wish to call
5. That's all there is to it, a 10 second ad will play, and right after, your call will connect

Instructions to receive calls:
1. Each user is given a unique identifier number. You will see this number after you've signed in under their software menu bar.
2. Basically, your family or friends will call a local number provided by iCall. Then they will punch in your ID number to connect to your computer or device.
3. Local access numbers for each state are given here http://www.icall.com/desktop/access-numbers/

Conclusion:
The installation and setup was a definite positive. They've streamlined the process so that calls are made easily and without complication. The call quality was decent, as the recepient recieving my call reported hearing echo and some voice cutoff. For reference, the connection I was at had a 1.5Mbps down and 384Kbps upload. I will be looking forward to long term usage in hopes that they will improve their services like Skype or Vonage.

Overall, considering that the service is free, iCall is a clear choice for those looking for free VOIP service. Enjoy the free calls.

.

Dec 8, 2008

Opera Flashblocker by Lex1

Found a great little tool for Opera 9 called FlashBlock. The tool prevents Flash Ads from loading but still gives us the option to play, or not play, a Flash object.

http://my.opera.com/Lex1/blog/flashblock-for-opera-9

I've edited the instructions from their site, so that they're more concise. 

Installation:
1) Close Opera, unzip 'FlashBlocker.zip' to some place on your harddisk.
2) Click on the top menu Help->About Opera! 
3) Now look for "User CSS directory"
4) Copy FlashBlocker.css to your user styles folder that you found in Step 3
5) Copy FlashBlocker.js (and FlashBlocker-white-list.js, if needed) to your UserJS folder like \profile\userjs. If you don't have this folder, create a new directory for storing User JavaScript files, for instance C:\Program Files\Opera\profile\userjs
6) Go to Tools -> Preferences -> Advanced -> Content -> JavaScript Options. Add the location of your newly created script directory to My JavaScript files
7) Restart Opera, select Flash blocker in menu View->Style and enjoy

.

Windows Server Standard 2008 Tweaks

After installing a fresh Windows 2008 Server Standard edition, I enabled and disabled the following to tweak my installation. 

_________________________________________

Convert Windows 2008 to a Workstation

http://www.win2008workstation.com/wordpress/
Download the automated Server to Workstation converter made by Sawo: http://converter.win2008workstation.com/

My Settings

General:
Enable Windows Audio
Optimize CPU Performance for Programs
Disable IE Enhanced Security Configuration
Enable Superfetch

Visual Tweaks
Disable Shutdown Event Tracker
Disable Verbose Messages at Startup/Shutdown
In addition to enabling themes, if you want to have your desktop look like the ones you've seen on Vista, you need to enable Desktop Experience:

Go to Server Manager
Add feature
Check on Desktop Experience

Network
Enable Wireless Networking

_________________________________________

Disable automatic driver updates:

Start menu, right click My Computer, Poperties
Click on Advanced System Settings
Click on Hardware Tab
Then Windows Update Driver Settings
Select Never check for drivers when I connect a device
Click Ok

_________________________________________

Turn off Indexing Services:

Right click on drive C: and then properties
Click off Index this drive for faster file searching
Apply to all files and subfolders
Click Ignore all if a message pops up
Once Windows is done, close

_________________________________________

Disabling Services (these are settings that worked for me, if you use a VPN, Windows firewall, adjust accordingly):

Go to your start menu and search
Type Services
Expand the  Services icon

Disable:

Application Experience 
Diagnostic Policy Service
Distributed Link Tracking Client
KtmRm for Distributed Transaction Coordinator
IP Helper
IPsec Policy Agent
Remote Access Connections Manager (VPN usage)
Secure Socket Tunneling Protocol Service
Shell Hardware Detection
Terminal Services
Windows Error Reporting Services
Windows Firewall
Windows Time


.

Dec 6, 2008

1000HA AR5007EG Wireless Vista Drivers

It was a challenge searching and installing wireless drivers for the 1000HA, so I figured I'd try and make the process easier for those who attempt a Vista install. Hope this helps.

From:
http://www.xpvistaworld.com/atheros_ar5 … r_1131.htm

Direct Link:
http://download.boulder.ibm.com/ibmdl/p … cna5ww.exe

Instructions:
1. Download and open, the files will unpack to a folder you specify
2. Go to Device Manager
3. Right click on Update Driver Software
4. Click Browse my computer for driver software
5. Point to the folder you specified in step 1, and click Next
6. The drivers will install, and you should be on your way to browsing

.

How to: Boot off a USB device for the eee PC 1000HA

While trying to install Windows 2008 Server on the 1000HA, I could not figure out how to get into the bootup menu. Just hold esc right? Well, with boot booster enabled, the bootup screen goes way too fast.

Here's how:
Press F2

Yep, that's it! Enjoy!

Initial Impressions of the Asus eee PC 1000HA


For potential buyers reading this, my initial impressions are from a person who was having buyer's remorse upgrading from an eee PC 701 to the 1000HA.

Concerns:
Weight and size of a larger 10" laptop when compared to the 701.

After receiving it today, I can finally put those concerns to rest. The 1000HA feels super light. I cannot notice the weight difference at all. Yes, if I picked up a 701 and then picked up the 1000HA, then I'd notice some differences, but during my average usage, the 1000HA feels light.

Pros:
The 10" screen is a godsend especially after using the 701 for so long. I will definitely explore some hobbies utilizing this larger screen i.e. web design, photography, and blogging.

I do enjoy the faster processor as well as the ease of upgrading the RAM.

I believe the biggest PRO would the support of the eeePC user forum. With such a large support base, eee PC users are able to do a lot more with their laptops.

The mouse and keyboard feel great to me. The mouse buttons are not stiff at all, and the keyboard feels like a full size keyboard. I use the left shift button, so no worries on the placement of the right shift key.

Cons:
Honestly, I was really looking forward to the multitouch pad, but after using it, the pad seems "laggy" and a little slow to respond for my taste. Don't get me wrong, the multitouch idea itself is awesome, but the slow response really kills it--my mouse movements are all over the place! Maybe I just need more practice.

Conclusion:
I am enjoying the 1000HA as we speak. Love the screen, faster CPU, weight, and full sized keyboard. No buyer's remorse. Lastly, to get some creativity juices going, I will be putting Windows 2008 server on this and vistafying it. Photoshop, dreamweaver, Vmware, Windows XP, and maybe a flavor of Ubuntu. Also, I'm looking forward to the release of the gOS Cloud OS.

.

Nov 21, 2008

How to: Add a borderless Flickr Slideshow to Blogger Gadgets

If you'd like a Flickr Slideshow added as a Blogger Gadget, like the one shown on this Blog, then we've got a solution for you.

Steps:

1. Log in to your Blogger and go to Dashboard

2. Click Layout

3. Click Add a Gadget

4. Scroll down to HTML/Javascript and Click the + sign

5. Put in a title if you want. Then copy & paste the following code into Content.

<iframe src="http://www.flickr.com/slideShow/index.gne?user_id=XXXXXXXX@NXX" width="180" height="180" scrolling="no" frameborder="0"></iframe>

6. You can resize the slideshow by replacing width="180" and height="180" with your own numbers. Replace XXXXXXX@NXX with your own Flickr id.

Don't know what your Flickr id is? Click here: http://idgettr.com/

7. Click Save and you're all set. Sit back and enjoy!

.

UltraVNC "Preconfigured to prevent users from setting their own password"

So we've installed UltraVNC on all of our machines via the Administrator login. Unfortunately, when we switched over to our User account, we got the following message:

"No password has been set and this machine has been preconfigured to prevent users from setting their own password."

If you received this message, as I did, here's what we have to do to fix it.

1. Log into your administrator account.

2. Go to the start menu and click Run

3. Type in regedit

4. Go to and select HKEY_CURRENT_USER\SOFTWARE\ORL

5. Click File and then Export to some location of your choice i.e. c:\UltraVNC.reg

6. Log into the User account that is displaying the problem above

7. Browse to the drive we saved the UltraVNC.reg

8. Double click and click Yes

9. Now, UltraVNC works

Tip: UltraVNC settings can be edited in the registry at HKEY_LOCAL_MACHINE\SOFTWARE\ORL\WinVNC3

.

Nov 20, 2008

How to: Remote Support via UltraVNC & DSM Encryption over VPN

"UltraVNC is a powerful, easy to use and free software that can display the screen of another computer (via Internet or network) on your own screen. The program allows you to use your mouse and keyboard to control the other PC remotely. It means that you can work on a remote computer, as if you were sitting in front of it, right from your current location." UVNC

In this post, we will go over the needs of a fictitious network we're going to support, and we'll go over instructions to install UltraVNC and deploy the DSM 128bit Encyption Plugin to our users(screenshots included). You can customize this tutorial to your own needs.

Needs on our Network:
Must work with a VPN
Connect from anywhere securely
Will run only when users need help (we do not want it running on every bootup)
Users will run the program after making a phone call to us
The program will run in the background (no tray icon)

Example: The following installation will be on a 4 computer network and 1 administrator computer

The installation file includes both Server, Viewer, and the DSM plugin. From our Viewer computer, the computers we'll be manipulating will be "Server computers." We will install UltraVNC Server on each of these 4 computers. Our computer, the administrating computer, will be the "Viewer computer," and we will only need UltraVNC Viewer.

Instructions:

Server Computers Setup:
1. Download via their website

2. Run UltraVNC-XXX-Setup.exe

3. Install UltraVNC on one of our "Server computers." For illustration purposes, it has an IP of 192.168.1.123


4. Once at this screen, untick all.

Optional
: If you want UltraVNC to start up every time at bootup to machines you wish to connect to, click on "Register UltraVNC Server as a system service."


5. Click Install. Exit out of any UltraVNC instances that pop up. Close down any background instances of WinVNC.exe

Copying and configuring the DSM Encryption Plugin
6. Now is the time to download and configure the DSM plugin. Download and unzip the file.

7. Copy the files to the location you installed UltraVNC, c:\Program Files\UltraVNC. As long as "MSRC4Plugin_NoReg.dsm" is located in the UltraVNC folder, then we should be ready for the next steps.

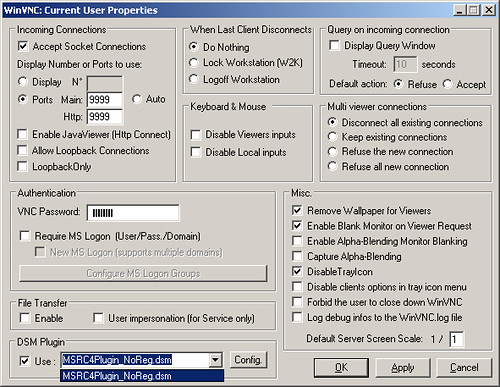
8. Open up UltraVNC Server. In this screen, the standard port for Main is 5800.

(If you change the port to something else, later on you will need to configure the client to match the port)

Set an authentication VNC password.

Next, click the drop down menu next to DSM Plugin and choose "MSRC4Plugin_NoReg.dsm."

Click Config.
9. When using the DSM Plugin, UltraVNC will be looking for a "rc4.key" which is the 128bit key we will generate. Name the key like the screenshot below "rc4.key" without the "".

Click Gen Key. OK.
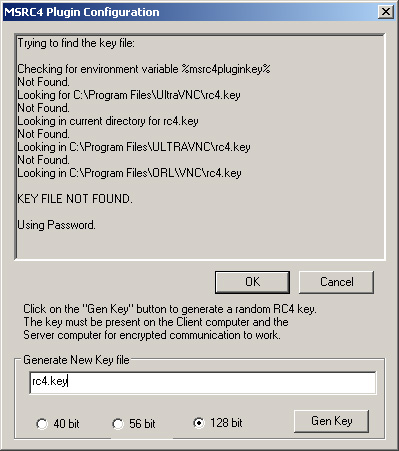

10. The key will show up in c:\Program Files\UltraVNC
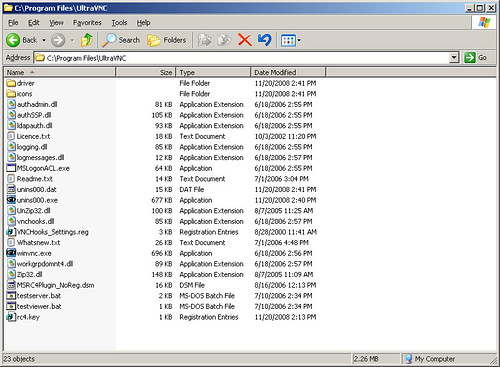
11. This key will be used on the computer we just configured as well as the client computer, so we'll need to copy this key on a USB stick to later transfer to our client computer.

Example: You could use this key by copying the key to all 4 Server computers and our 1 client computer c:\Program Files\UltraVNC.

Viewer (admin, support desk) Computer Setup:

1. Run UltraVNC-XXX-Setup.exe

2. Click the drop-down menu and select Viewer Only. Install.

3. Copy the rc4.key, we generated earlier and copied to our USB stick, and copy it to our Viewer comptuer c:\Program Files\UltraVNC

Testing via VPN:

1. Using our Viewer computer, now, we will connect over the Internet via our VPN connection. Once we're connected to our local network, we will then connect to the "Server computer" we just set up.

2. On the "Server computer," have the user open up UltraVNC Server. It will load up and run in the background.

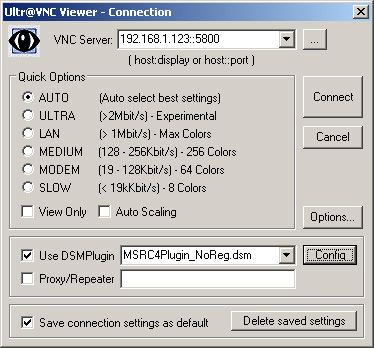
3. On our "Viewer computer" open up UltraVNC Viewer, click Connect, and type in the password. You should be able to now see the "Server computer's" screen. Congratulations!

.

Nov 19, 2008

The Original FREE P90X Excel Workout Sheet

Simple P90X Excel Workout Sheet for: Chest & Back, Shoulders & Arms, Legs & Back, Chest Shoulders Triceps, Back & Biceps
Originally posted: March 7th, 2008

A free and simple P90X Excel Workout Sheet made to keep track of our performance during workouts. It's a simple excel sheet following 5 workout routines. You can easily fill in how many reps you did and the weights.

Instructions:

1. Download:
http://rapidshare.com/files/109134670/workoutsheet.xls

2. Print each page and staple

3. Keep the paper next to your workout spot to write down reps and weights

P.S. I took down my other site P90Xlive.blogpot.com to consolidate it into this one.

.

Oct 16, 2008

How to set up a Power Kite: Step by Step


The goal of this video is to help new power kite flyers get into the sport. The kite in the video is a fixed bridle quad line power kite with a two handle setup.

If you're flying for the first time, please fly with the appropriate wind/weather conditions for your kite.

0:10 Unpacking
0:40 Bridles: Power and Brake lines
1:00 Lay out your lines
1:10 Attaching our power line to the bridle
1:25 Lark knot
2:15 Attaching our brake line to the bridle
2:50 Handles
3:42 Launch
4:07 Troubleshooting tips


Click through to Youtube for more tips in the description and comments section

Feb 14, 2008

How to: Install WinXP + Nlite via Acronis to SD or USB

Updated 4/08/08: uploaded compiled cabsdk files and compiled Hitachi Microdrivers files. For my results and experience, please refer to the end of post #2. Also, please read Tommot's post #4 for additional install information.

Hey everyone,

I'm writing this up as an addon to the eeepc wiki. The information here was taken from the wiki and the forum so many props go to the original creators CorvetteZ0606, DonkeyBeliever, and all others. 

This guide will install Windows XP to a SD card via Acronis and Nlite. Hopefully this will help solve some of the problems we all had to go through, to save you TIME, and to get you up and running. The guide is long as I put in every detail I went through. I will add more to it later.

Honestly, I made 6 XP CD's, and installed probably 10 times until I got it working.  Yes, it finally works! Through my trials and errors, here's what I learned:

____________________________
What I used:
Asus eeePC 4G Laptop
40GB USB hard drive, I've tried a 16GB USB stick, and 2GB SD Card and they all work
Another PC Desktop referred to as Main Computer
Wiki method 2 and part of method 1 (http://wiki.eeeuser.com/howto:installxp)
Windows XP SP2
Microsoft Cabsdk EDITED cabsdk (http://rapidshare.com/files/92250474/cabsdk.rar) OR (http://download.microsoft.com/download/ … cabsdk.exe
Nlite (http://www.nliteos.com/download.html)
Hitachi Microdrivers EDITED Hitachi Microdrivers (http://rapidshare.com/files/92250062/ed … 24_320.rar) OR (http://www.xpefiles.com//files/xpfildrvr1224_320.zip)  
External USB CD-ROM
Acronis Home V11
Notepad2 (http://www.flos-freeware.ch/notepad2.html)

____________________________
Problems I had before figuring this out:
BSOD right after seeing the Windows XP Boot Logo
The BSOD said windows has to shutdown to prevnt further damage bla bla bla. Something partition, virus, bla bla bla

____________________________
Method:
(you can substitute your USB device when I say SD card, ie USB stick, SD, hard drive)
Backing up Xubuntu, Xandros, etc. on your eeePC for later restoration
Connect your external CDROM
Boot eeePC and hold Esc
Insert Acronis Boot CD
Backup your SSD on the eeePC via Acronis Boot CD to your SD card using Backup
Name your file xubuntueeepc, xandroseeepc whatever
Save to your SD card
Close Acronis and reboot
Once safely rebooted, remove SD Card
Copy “xubuntueeepc” file from the SD to your Main Computer

____________________________
On your Main Computer
Put your XP CD into your main PC
Open up Nlite
Use Nlite to Copy XP to your main PC c:\xpsdhc
Leave Nlite open and minimize

I've compiled the USB cabsdk files here: http://rapidshare.com/files/92250474/cabsdk.rarOR do the following 4 steps
-Follow the wiki and edit the usb... files (download and use notepad2 to edit) (http://wiki.eeeuser.com/howto:installxp)
-Follow steps 2-23 on the wiki method 2
-Copy these edited files back to I386
-Go back to Nlite, which you minimized

Here are screen captures of my Nlite install for reference:http://rapidshare.com/files/92255558/nl … ptures.rar

Now create your ISO to CD
Burn your ISO to CD (my ISO was roughly 320 megs)

____________________________
Turn on your eeePC and hold Esc
Boot up to your external CDROM and boot off of the new XP CD you just created
Delete all partitions on the SSD
Install XP to the SSD

____________________________
Upon first boot into XP
Go into System Properties, Turn off system restore, paging file, and screensaver
I've compiled the Hitachi Microdrive files here: http://rapidshare.com/files/92250062/ed … 24_320.rar OR follow the next 2 steps
-Take a SD card and copy the Hitachi Microdrivers from your Main Compute to the Desktop of the eeePC WindowsXP
-Follow the instructions on the Wiki in Method 1 to edit the .inf file (http://wiki.eeeuser.com/howto:installxp)

Right click My Computer on your eeePC and go into System Properties
Go into Update Drivers and install the Hitachi Microdrivers to Cardreader
***Refer down below to Tommot's post***
When The Hardware Upgrade Wizard window opens:

1. choose, Yes, this time only
2. choose, Install from a list or specific location (advanced)
3. choose, Don't search, I will choose the driver to install
4. click, Have Disk
4. browse, point to the Microdrive filter folder on your desktop
5. the final window you will see is that the Hitachi Microdrive has actually been selected 
and is ready for installation. you will also see the caution sign ...This driver is not digitally signed.
***----------------------------------------***

Before rebooting!!! Confirm in My Computer that your SD card shows a Local Disk and not a Removable drive, if trying a USB stick, confirm that it's a Logical Disk
Confirmed: (If you want to use a USB thumbdrive or hard drive, for your XP drive instead of SD, you'll need to connect the USB stick up for windows to recognize it, and after windows XP installs the drive, instead of installing the Hitachi driver for the cardreader, do so for your USB thumbdrive)
Reboot
Let XP load
(If installing to a drive bigger than 4 GB +, then now's the time to resize your partition on your main computer. I used Acronis Disk Director V10)

____________________________
Put in the Acronis Boot CD to your External CDROM
Reboot XP
Hold Esc and boot to CDROM
Backup the SSD drive with XP and name it eeepcxp. Backup to your SD
Close Acronis and reboot
Once safely rebooted, remove the SD Card

____________________________
Copy “eeepcxp” from your SD Card to your Main Computer
Open up Acronis Home V11
Restore eeepcxp to your SD Card that you want to boot off of (restore all including the MBR)

____________________________
Go to your eeePC, change the background to something else

____________________________
Back to your main computer, once the backup is finished, stick it in your eeePC and reboot
Hold Esc
Boot off of your SD card

____________________________
If all is well, you can now restore your original drive with whatever was on it.
Copy xubuntueeepc you originally backed up to another SD or USB stick
Restore xubuntueeepc to the SSD

Once finished close Acronis and reboot
Hold Esc
Boot into XP
Grab your ASUS CD that came with your laptop
Install the drivers

(If you used a SD card larger than the partition of 4GB, and there's unpartitioned space, you can try using Acronis Disk Director V10 to resize the partition)

There we have it! Hopefully all is well. Good luck!

It turns out the 2GB SD install was too limited for my usage. After trying to install Adobe CS3 suite, the Shared Common Files blew up the installation past my 2GB SD card limitation.

I've now tried installing XP onto a 16GB USB Thumbdrive using the methods described above. I can confirm that it works.

First impression is that it loads a little slower, but this could be due to my USB Thumbdrive specs. Overall, I'm happy with the install, and with the extra space, think of the possibilities.

EDIT 2/15/08: I've run into some problems with the USB install, so until I figure this out, the USB thumbdrive install is unconfirmed unless another user can confirm it?

EDIT 2/17/08: Confirmed, by following the tutorial, the USB stick install was successful. I'm currently installing the asus drivers, windows update, and apps on a 16GB flash drive. EWF, Enhanced Write Filter, is the next feature I'm researching to limit the amount of writes to the disk.

EDIT 2/20/08: Productivity on an USB SD or Flash drive was too limited and slow for my use. I've changed mediums and have settled with a 2.5" USB hard drive.

.