Nov 30, 2011

DIY Suzuki DRZ 400SM Windscreen Tutorial


Wind is a challenge especially when riding the DRZ at freeway speeds because without a front windscreen, riding on a windy day feels like someone turning on a leaf blower to your chest.

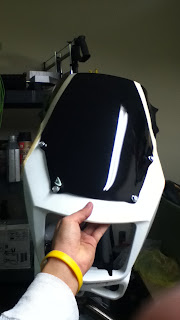
I had an extra windscreen from an Aprilia RSV Mille 01-03 laying around, and figured I'd adapt it to my DRZ for some wind protection. Using a few nuts and bolts, a Dremel, and a sanding block, I was able to create a functional and stylish windscreen for my DRZ 400SM.

Materials:
Masking tape
4 of each: nuts, bolts, washers, and locking washers
Dry erase marker

Bill of Materials:
$25

Tools:
Drill
Dremel
Sanding block
120 Grit sandpaper (very coarse)

Tutorial:
  • 1. Place your windscreen over the front DRZ cowl and mark the drill holes with a dry erase marker
  • 2. Drill out the holes
  • 3.  Secure the windscreen with nuts, bolts, washers, and locking washers
  • 4.  We're going to use the masking tape as a guide on where to cut, so using the edge and angle of the DRZ cowl as a line guide, we'll place the masking tape on the cowl and all the way to the end of our new windscreen.

  • 5. Do the same as step 4 on the other side


  • 6.  Use your Dremel and carefully cut while using the masking tape as your guide.


  • 7.  The edges will be rough with melted plastic from the heat of the Dremel. We'll snap this gunk off, then using our sanding block, sand down both sides of our new windscreen.


  • 8. Install the windscreen/front cowl to the DRZ. Now we can enjoy riding longer distances at freeway speeds.


Nov 29, 2011

DIY GoPro Extended Battery Pack :: How To

DIY GoPro HD Extended Battery Pack

While GoKarting at our local track, I was a half an hour into the session when my battery died, and I thought to myself, "Man, I will be missing some epic footage. When I get home, I'm going to put together a rechargable battery pack for the GoPro."

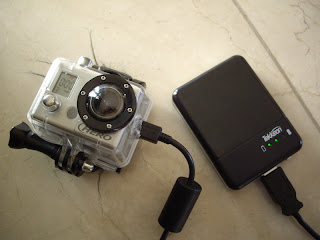
This extended battery pack will let you record for an extra 2 hours give or take. You can replace the batteries of the Tekkeon Battery Pack with more AA batteries. The only downside to this mod is that you will be drilling into your GoPro's plastic case, so it will no longer be waterproof. Other than that, you will have hours of recording time, which means you'll run out of memory before the batteries run out.

Materials:
USB to mini-USB cable
Tekkeon USB Mobile Battery Charger (Also works with the iPhone, Pod, etc.)
Hot Glue Gun stick
4 AA NiMH rechargable Batteries

Bill of Materials:
$24

Tools:
Drill
Dry erase marker
Hot Glue Gun

Disclaimer: This is for demonstration purposes only. Please use safety precautions whenever working with power tools.

Instructions:

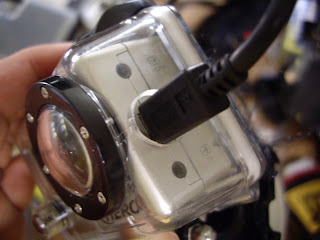
1. Grab a dry erase marker and mark your drill point at the USB connector.
GoPro HD Battery Extender
2. Remove the GoPro.
GoPro HD Battery Extend
3. Drill out the marked point.GoPro Battery Mod
4. Fit USB cable into GoProGoPro HD2 Battery Mod
5. Prepare hot glueGoPro HD Extended Battery Pack
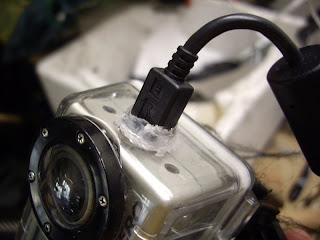
6. Create a seal of hot glue around the GoPro. Once the hot glue cools down, it can be removed along with the cable, so you'll have a perfectly molded seal for the cable and case. On days when you're recording short sessions, you can remove the cable and insert a plug.
GoPro HD Battery Pack
DIY GoPro HD Extended Battery Pack

Nov 28, 2011

Remove Yamaha Raptor 700 Baffle :: How To

Yamaha 700 Raptor Muffler

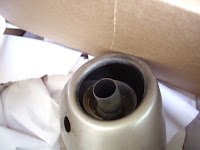
Yamaha Raptor 700 Baffle Removal
1. Remove bolt with an allen wrench Yamaha Raptor 700 Removal
2. Grab a torch and heat the outter ring of the baffle.
3. (Be careful of the heat) Then use a flathead screwdriver to kneed the baffle loose.
4. Use a pair of pliers to pull out the baffle.
Yamaha Raptor 700 Baffle Removal
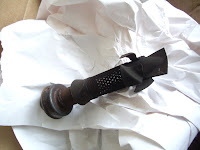
5. This is how the baffle looks removed. The torch is pointing to where you need to apply heat. As you can see, there's a bit of rust on the baffle, which is causing the seizure.

Yamaha Raptor 700 Baffle Yamaha Raptor 700 Baffle Remove
Yamaha Raptor 700 Baffle Suzuki DRZ 400 SM Pro Circuit T4 Exhaust
I was attempting the Foot's Mod for my DRZ 400SM's Pro Circuit T4 exhaust. The exhaust is way too loud for my taste, and the Foot's Mod requires a Raptor 660 baffle to insert into a T4 exhaust. I could not source a 660 baffle, so I went ahead and tried the next best thing, the Raptor 700 baffle. Well, I can tell you now that the Raptor 700 baffle does not directly fit, so for those looking attempting the Foots Mod, try and source yourself a 660 baffle. The 700 baffle will require some modification to make it fit.

Nov 15, 2011

Blogger blog has been removed Error


My blog has been down due to an erroneous SPAM issue with Blogger. Somehow my blog was automatically marked as spam prompting Blogger to completely remove my blog. My blog was no longer viewable on my Dashboard, and my blog disappeared without a trace.

I understand how spammers make spam blogs, i.e. quick rich schemes, but I wish Blogger had some kind of warning to inform me that my blog was being reviewed for SPAM. It was alarming to wake up, log into my blog, to find everything gone. "Was I just hacked?" was the first thing that went through my mind. After some further reading, I found some answers.

The only solution is to post on the Blogger user forums and request a Spam Appeal. Only legitimate requests meeting Blogger's appeals criteria will be accepted. Spammers need not apply because you'll be banned forever anyway. Also, if your Google account is blocked from the forums, then you'll need to sign into another Google account to post a question to the forum:

Tip: Be clear and concise to have your question answered.
http://www.google.com/support/forum/p/blogger/label?lid=42512ba1ddda2647&hl=en

My appeals process:
http://www.google.com/support/forum/p/blogger/thread?tid=0776b0d4c1f9a9e8&hl=en

I'm happy with the response time in the Blogger Forums. My question was answered in a timely manner, and my issue was addressed within the day.